Clue Simulator: Technicalities
My choice of a final project for Programming 1 was to create a game similar to the Hunger Games Simulator. If you’d like to learn more about the origins of the idea, click here. Instead of being based off of the Hunger Games, my program is based off of the board game, Clue, though the idea of each character being eliminated comes from the novel And Then There Were None by Agatha Christie. For those of you who don’t know what the Hunger Game Simulator is, basically you’re given a list of characters from the Hunger Games, or in my case, Clue. Once you click the proceed button, the characters are put into a list. Next to each character is a line of text saying what happened to them/what they did in that round. The rounds continue until all but one character is eliminated. If my description didn’t make much sense to you, you can click here and try the Hunger Games Simulator out, or you can click here to see a playthrough and click here to see how it works.
The main thing that I learned while writing this program was how to add an image to my game using a little thing called Tkinter. Tkinter is a GUI (graphical user interface) that’s already imported into Python (the programming language we use). Simply stated, it allows you to put graphics into your code. Thankfully, the only website I really needed for this was daniweb.com (click here if you’d like to check it out), since it pretty much laid out all of the code I needed, along with good explanations on what each section of the code does. I needed to learn this mainly because I was wanting to give the user a character list to look at in case if they haven’t seen the Clue characters before. If they have already seen them, the images still give the game a little more “life”. Everything I needed was already included in Python, which was convenient.
————————————————————————————————————Some Code I’m Proud Of…————————————————————————————————————
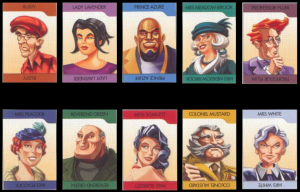
canvas = Canvas(width = 710, height = 520, bg = 'black')
    #
    # Packs the canvas into a frame/form.
    #
    canvas.pack(expand = YES, fill = BOTH)
    #
    # Loads the .gif image file.
    #
    mustard = PhotoImage(file = 'mustard.gif')
    green = PhotoImage(file = 'green.gif')
    plum = PhotoImage(file = 'plum.gif')
    azure = PhotoImage(file = 'azure.gif')
    rusty = PhotoImage(file = 'rusty.gif')
    white = PhotoImage(file = 'white.gif')
    scarlet = PhotoImage(file = 'scarlet.gif')
    peacock = PhotoImage(file = 'peacock.gif')
    meadowbrook = PhotoImage(file = 'meadowbrook.gif')
    lavender = PhotoImage(file = 'lavender.gif')
    x = PhotoImage(file = 'redx.gif')
    #
    # Puts a gif image on the screen.
    #
    canvas.create_image(10, 10, image = rusty, anchor = NW)
    canvas.create_image(150, 10, image = lavender, anchor = NW)
    canvas.create_image(290, 10, image = azure, anchor = NW)
    canvas.create_image(430, 10, image = meadowbrook, anchor = NW)
    canvas.create_image(570, 10, image = plum, anchor = NW)
    canvas.create_image(10, 260, image = peacock, anchor = NW)
    canvas.create_image(150, 260, image = green, anchor = NW)
    canvas.create_image(290, 260, image = scarlet, anchor = NW)
    canvas.create_image(430, 260, image = mustard, anchor = NW)
    canvas.create_image(570, 260, image = white, anchor = NW)
    mainloop()
    textX = 210
    textY = 10
    textString = ''
This chunk of code is what makes the character images pop up on the screen. Since I found out how to get this to work on my own, I was particularly proud of it. Most of my code was based off of things we learned in class, so having a part of code that I taught myself how to set up makes it really special to me. Not only that, but the fact that it actually worked made me extremely happy.
————————————————————————————————————Some Cringey Code…————————————————————————————————————
def print_instructions():
    """Gives the user instructions on how to play the game."""
    slow_print("""
================================================================
~~~~~~~~~~~~~~~~~And Then... There Was A Clue~~~~~~~~~~~~~~~~~~~
================================================================""")
    slow_print("""Welcome! This is a simulator based off of a combination of the
board game Clue and the novel And Then There Were None. You will
first be given a list of 10 characters to choose from. Choose
the one you believe is the murderer. Once the character is
chosen, the game will begin. There will be up to 10 rounds where
the characters are printed in a list with a description of what
they did during that round. You will be notified after each
round if a character died. If your character dies, you were
obviously incorect.
Good luck, my esteemed investigator.

Mr. John Boddy
================================================================
""")
This code is only cringey to me because it takes forever to print out. The slow_print means that the line is printed out letter by letter, instead of all at once, so having it go through the decorative lines, as well as the title takes an excessive amount of time. Originally I was wanting to print out the title (And Then… There Was A Clue) at the same time as the lines above and below it. The only problem was that, in order to do this, it’d require learning a bunch of other code, which was way more work than needed. Another thing that’s cringey with this is the title in general. I was wanting to include elements from the novel And Then There Were None, as well as Clue, but the only thing I could really come up with was “And Then… There Was A Clue”. In my opinion, this title just sounds a bit strange.